Theory vs Praxis
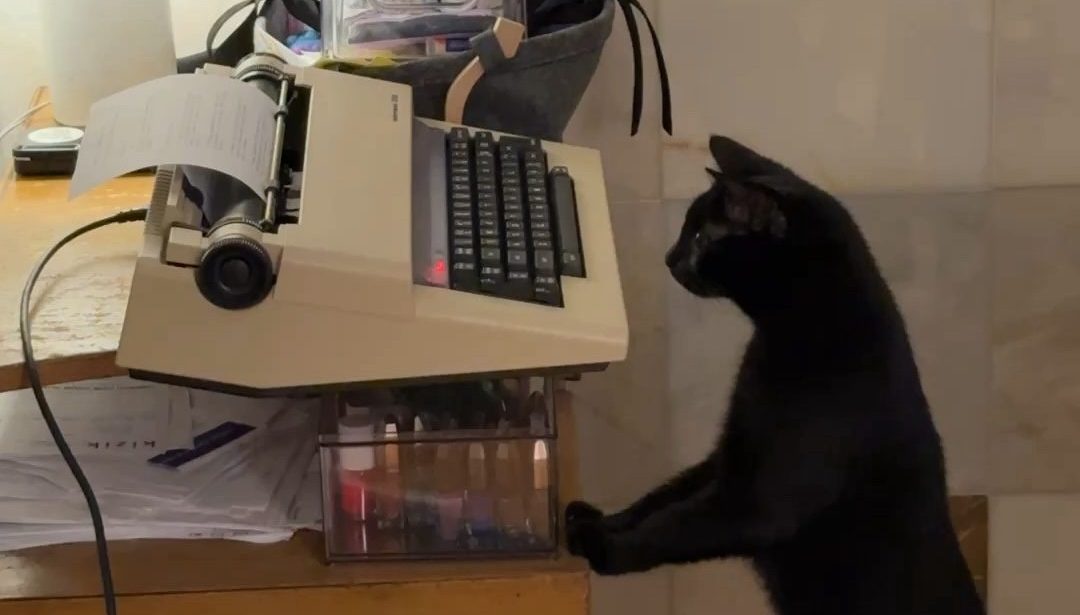
Almost two months ago, I shared my generative daily planner project, a little executive assistant built into a vintage electric typewriter. Shortly after, a friend reached out with a special request: could he commission one of these as a gift for his boss, whose grandfather used to work at Underwood (a powerhouse typewriter manufacturer of the early 20th century)? This was tricky. Underwood, it turns out, never quite made it to the PC era: no Underwood typewriter (to my knowledge) ever shipped with the ability to interface with a computer, unlike the IBM Wheelwriter I used in my original project. To make things more complex, my original proof-of-concept was FAR from a shippable product. Could I create a version robust enough to support an end user other than myself? I’ve been in UX research for a decade, so I know how impatient and fickle most users are. Anyway, it sounded like a perfect challenge, so I told my friend to give me two months, sending me down a series of rabbit holes I’ve only just emerged from. Here’s where I wound up:
On the theory that this might help future googlers much as prior art helped me, here are some field notes from my journey reverse-engineering a ~1983 Underwood 3500 typewriter!
The Underwood 3500
Picking a typewriter was kinda the easiest part of this daunting project, only because there just weren’t that many options. Underwood was known for early manual typewriters, but I knew I needed an electric typewriter so there’d at least be a circuit board to interface with. Some folks have figured out clever ways to interface with manual typewriters, but mostly those involve sensing the typewriter’s keystrokes and converting those to be a computer input. My project requires me to simulate keypresses on the typewriter’s keys, which is an entirely different challenge. That too CAN be done with a manual typewriter: others have innovated using solenoids to effectively punch down on a manual typewriter’s keys, which creates an incredible effect, but is a very loud, visible, complex and error-prone approach:
In contrast, an electric typewriter’s keys have a less direct, mechanical relationship with the printhead. Typing on the keyboard of an electric typewriter yields the same satisfying cha-chunk of a manual typewriter, but behind the scenes the interaction has a lot more in common with a computer keyboard. You close a circuit by pressing on a key, which tells the logic board that it’s time to trigger that key on the printhead. It’s a lot easier for a little Raspberry Pi or Arduino to simulate the electrical action of closing a circuit than the mechanical action of pressing a physical button.
I only found one appropriate keyboard wearing the Underwood brand: the Underwood 3500, circa 1983. There happened to be one for sale on eBay, but not a ton of information online about how it worked or how to interface with it. I asked my friend to buy it and ship it to me, figuring that it was kinda the only option. I don’t know how much further I would’ve ever gotten with this project if not for this random ad in a 1985 issue of Stereo Review magazine:

From here, I learned the all-important fact that the Underwood 3500 we’d just purchased was a re-branded variant of a somewhat better-known typewriter, the Olivetti Praxis 35. (The ad also references a vague optional ‘computer interface’ which sent me down a whole different rabbit hole!) Learning about the Underwood’s Olivetti cousins unlocked this entire project, to such an extent that I’ll mostly reference the Olivetti Praxis 35 rather than the Underwood 3500 for the rest of this post.
Once my Underwood 3500 arrived, I expected it to just turn on and work. It didn’t. This whole family of typewriters straddles the mechanical and the electronic in fascinating ways. Most critically, the carriage itself is moved back and forth along the platen by a spool of cord, which arrived hopelessly tangled.
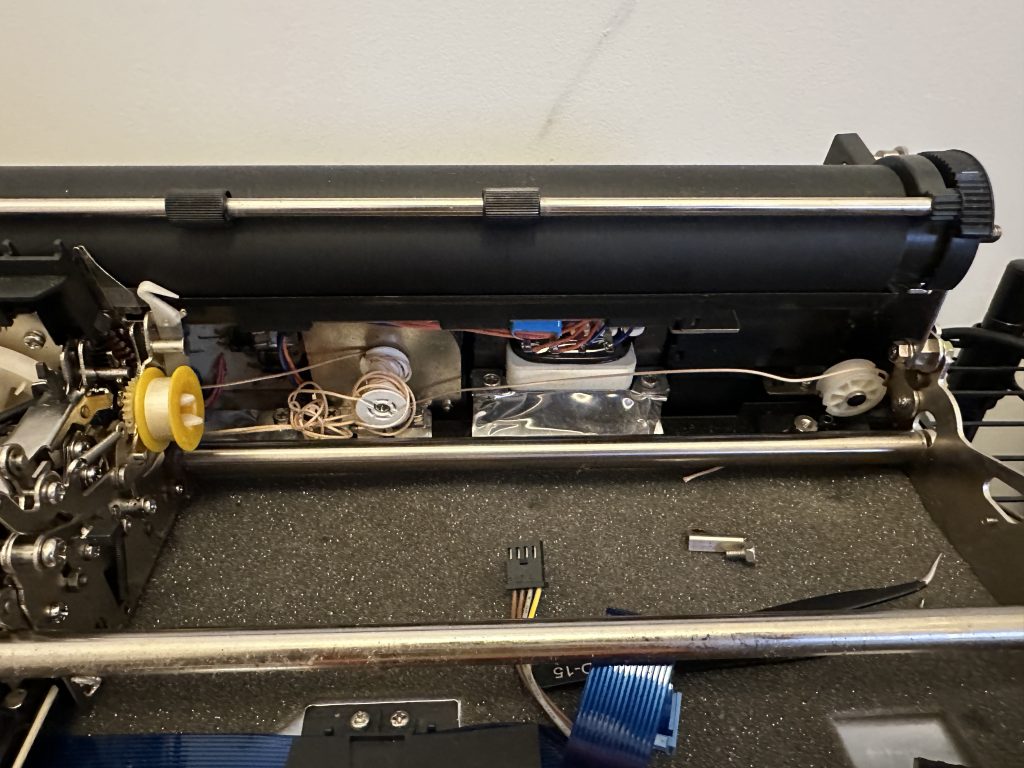
Trying to learn how to re-spool this carriage wire led me to an invaluable resource: Verein zum Erhalt klassischer Computer e.V., aka the Association for the Preservation of Classical Computers, a German-language vintage computing forum. One of the forum’s members is a former Olivetti employee who has spent years collecting and sharing technical details about 1980s Olivetti typewriters, including the Underwood 3500 and its cousins from the Praxis series. His photos and technical diagrams were critical AND included his own experiences respooling the carriage wire.
Now that I had one working typewriter, it was time to figure out how to talk to it.
Getting Connected
Learning more about the Praxis line of typewriters led me to some other absolutely vital prior art: a series of 1980s articles from homebrew magazines by folks who had learned to convert these typewriters into printers by connecting wires to microprocessor pins and then simulating electrical signals. Before too long, I’d deciphered the pinouts and reproduced the jumper cables on my own typewriter’s logic board.
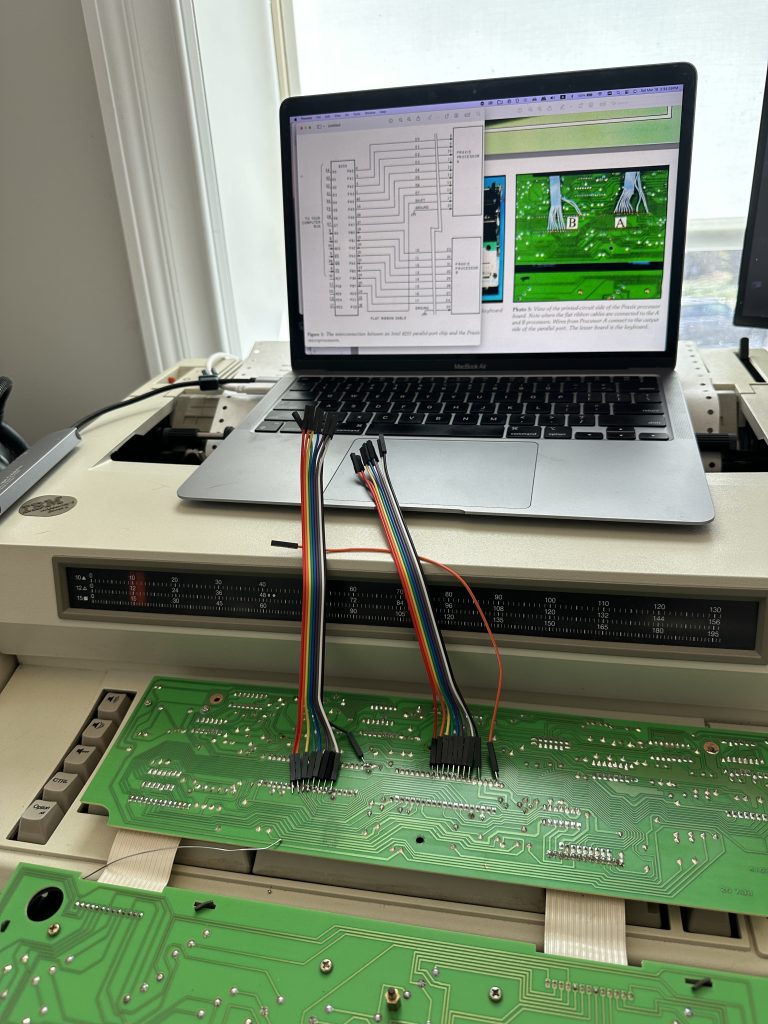
Wiring up the typewriter was easy, but getting 1980s-era sample code to work on my microprocessors was a different story entirely. So much of this was beyond my ken, and relied on a lot of contextual knowledge about C, Pascal, Z-80 processors, etc. that I just lack. Fortunately, today’s LLMs have much larger context windows and capabilities than even those from last year. I was able to take screenshots of diagrams, painstakingly OCR the articles and code samples below, and pipe them through to gpt4, Claude, and Gemini Pro to help me make sense of things and adapt the relevant code to Python or Arduino.
These resources were such game-changers, I just want to briefly cite my sources here with a deep heartfelt thank you:
- “An Inexpensive Letter-Quality Printer,” Stuart Brown, BYTE, May 1983
- “Typewriter to daisywheel printer,” Neil Duffy, Wireless World, August 1983
- “Cheap Daisy Blossoms,” Gary Kaufman, Micro Cornucopia, October 1983
- “A Centronics-type microcomputer parallel interface to Olivetti Praxis typewriters”, R. S. Tse, Journal of Microcomputer Applications (1987)
A word on microprocessors.
My friend initially wanted on-device LLM processing, which sounded like a great enhancement to me. I’d rather that than pipe email summaries to OpenAI, even if they’ve promised not to use those samples in their training data. I’d learned that the new Raspberry Pi 5 is fast enough to support local LLM models like Mistral 7b, and I was able to get this to work as a proof-of-concept, but I was disappointed with both speed and quality / originality. Also, there just wasn’t enough room in the typewriter’s case to fit a Pi 5.
So I tried a Raspberry Pi Zero 2 W. I thought it could handle both sides of the coin: interfacing with the various Google, OpenAI, and other APIs I would use to generate the agendas, as well as lighting up the GPIO pins that would make the typewriter type.
Maybe it is capable of doing such things, I don’t know. It never worked for me, perhaps because the Pi’s GPIO is too slow or there’s too much linuxy overhead. In the end, I got it working with an Arduino Nano Every, which seemed much better-suited to the job. So my interface lets both boards do what they’re best at: the Pi connects to the web and is the brains of the operation, while the Arduino does lower-level text writing and reading and is hooked up directly to the typewriter. (This also saved me from the trouble of thinking too hard about adapting the typewriter’s 5v voltage to the Raspberry Pi, which operates on 3.3v.)
I 3D-printed a custom mount of the two boards, designed to fit directly beneath the keyboard’s logic board. It’s a snug fit, and I hope it doesn’t overheat, though I added a heatsink after noticing some airflow issues.


As seen above, the Arduino Nano Every connects to the rows and columns of the Praxis keyboard matrix, by way of these two processors. The Raspberry Pi Zero 2 W connects to the web and various APIs, generates an agenda, and sends text to the Nano via USB serial. Both are conveniently powered by the Praxis 35’s existing 5v DC, which previously was only used to pulse the keyboard matrix.
Onboarding & OAuth
The act of actually generating an agenda is comparatively simple: as with my initial proof-of-concept, I pull subjects and summaries from the last 24 hours of the user’s Gmail inbox, as well as upcoming events from the next 7 days of the user’s Google Calendar. This text is combined with a prompt and sent to the gpt-4-turbo API, from which the agenda is generated. (A quick sidebar: in this version, I added some additional functionality: the script also pulls local weather info from the NWS, and local news from the Bing News Search API. Just getting local data is such an interesting challenge! It’s easy for me to find traffic alerts / notices that are specific to certain cities. But I needed something that would sense the user’s location and pull relevant data, without figuring out how to connect to the transit authorities of every big city in America. The Bing News Search API is the closest I got to this: my script gets lat/lng data by scanning local wifi networks, then pipes a request for local news to Bing and folds this into the agenda code.)
While generating the agenda is easy enough, getting a user connected is much harder. In my proof-of-concept I was able to just authenticate my own account via Google’s command-line libraries, then pipe the resulting text to the typewriter. But Mr. Underwood — yes, his name is Mr. Underwood — needs to operate completely headlessly. My users won’t have access to the command line or another machine. And Google’s OAuth implementation has pretty strict security requirements, especially for headless IoT devices.
In the end, I figured out a solution that feels pretty clever. I registered a domain name to handle OAuth login, and the typewriter types out a its URL and asks users to head to their phones to complete the authentication process. At the same time, the Pi is setting up a temporary webhost and a Cloudflare tunnel tied to that domain name, so that it can receive Google’s auth credentials from the redirect address. As soon as that happens, it closes the webserver and types out a congratulatory message. All other interaction occurs through the typewriter interface itself.
One silver lining to two-way communication is that interpreting text typed on the typewriter was fairly easy to implement. While the original code samples I adapted were focused on sending text to the typewriter, I was able to use the same wiring to sense typed text. This was critical so that the typewriter could read a user’s input. This is particularly critical in onboarding: when the user first boots up Mr. Underwood, he detects that he’s offline and asks the user to type in a wifi network name and password. It’s also useful later in the journey: I assigned a seldom-used key (EXPR) as an action key that generates a printed agenda on-demand. Another seldom-used key (RELOC) brings up a menu, which allows the user to change their wifi network, schedule their agenda, get a synopsis of the project or completely reset the system.

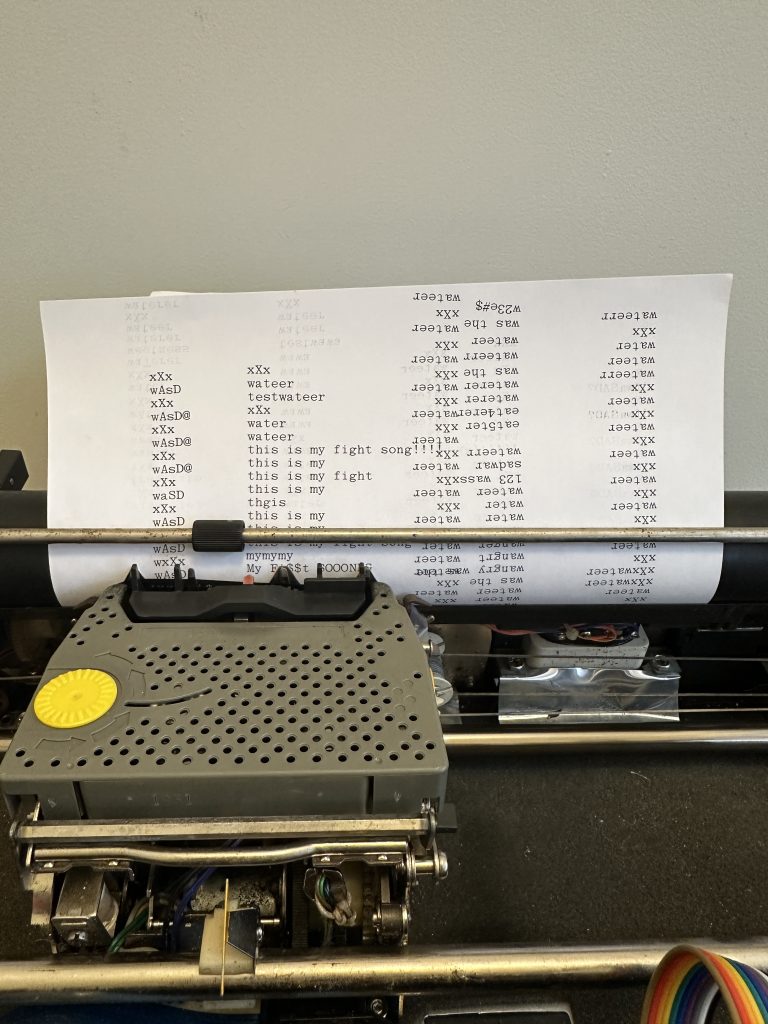
The hardest part to figure out was debouncing, or filtering out noisy analog signal from intentional keypresses. The keyboard matrix works by sending certain pins high on a sequence, and then listening to see whether other pins have gone high, in order to determine whether a key has been pressed. I learned from the 1980s articles above that the system expects a certain keypress signal to be sent 4x in order to count as an intentional press. But the timing is so tight! I found it super challenging to titrate the millisecond-long delays such that keypresses were actually detected – double letters make this even more difficult. And each time I tried to add more functionality to the Arduino code, it complicated the code’s ability to reliably sense and assert the keypresses. This is just one reason I was glad to use two microprocessors for this project: it let me focus the Arduino code on just reading and transmitting characters, minimizing the load on the processor. As it stands, I have to slow the code down to make sure that simulated keypresses aren’t misinterpreted by the typewriter. Fortunately that’s pretty compatible with the analog feel of the project!
Getting this working right took forever. I have so many sheets of paper that read like that one scene from The Shining. Mostly I found myself typing “sweater” or “wAsD” on the typewriter and checking the terminal to see if my input had been properly received and debounced. (Capital letters introduce another element here — the shift key has its own set of pins outside of the keyboard matrix, which need to be sent simultaneously with the key’s column/row pins in order to depict a capital letter.) Without debouncing, “sweater” comes back like “ssssswwweeeeaaaatttteeeerrrr”. With improper debouncing, it might come back like “weateer.” It’s all in the timing, truly.
Since I have two-way communication working, I gave serious consideration to maintaining a conversation history and allowing the user to communicate with Mr. Underwood like a normal chatbot. This is super compelling and I might implement it in the future, but it was simply out-of-scope for now. Doing it right would probably require it to have the ability to re-query the email inbox, possibly using some vector embeddings for semantic similarity. Also, it introduces complicated privacy issues: it feels much better to just save the user’s emails / calendar events in a transient variable that’s gone as soon as the agenda has been generated.
QA & Play-testing
Thinking about a shipping product instead of a quick proof-of-concept requires a whole different mindset. Developing an onboarding / auth flow is just one piece of it. I had to think about what the user would experience when they first power the computer on, how the system would gracefully recover from bugs, etc. Over time I learned the hard way that I needed to bake in a default wifi network and a reset process tied to a certain hidden keystroke. The thing has to work out of the box, and that’s tough when it’s making API calls that may take several seconds each. I tested this with my partner, who is used to things… just working. Waiting for 20 seconds for the typewriter to produce an output just feels broken. I baked in a lot of extra helper text thanks to this, and tried to find timing efficiencies in the code wherever I could.
Trying to think more cleanly about the architecture presented another challenge. Generally my process is pretty simple: get each little bit of functionality working in isolation, then try to bring them together. In this case, the Pi’s drive was littered with sample Python scripts for reading from the typewriter, generating an agenda, pulling local news from Bing, etc. But with all my auth/onboarding/reset/settings functionality, the code was just way too hairy to run in one script. So I built a bunch of separate interlocking Python scripts that split up the functionality, in an effort to make the code cleaner and make debugging easier. One is the primary script that’s always listening for typewriter input. Another generates an agenda. Another runs a cron job scheduler. Another connects to Wifi and handles Google OAuth. It’s a lot. I’ve had to learn a ton about circular imports and message queues, more than I’d ever wanted to.
I also spent a lot of time on a small, sort of optional bit of QA. A typewriter generally has no idea if it has paper loaded or not. This isn’t a problem because the user is always in the driver’s seat. But with my project, the system could easily spit out text when there’s no paper loaded. This too was frustrating to solve, but in the end I used a cheap IR module with a custom 3D-printed mount. The guiding theory is that when paper is loaded, IR is reflected back to the receiver, but the black carriage roll absorbs the IR light, so the receiver reads nothing back.

Conclusion
There’s so much more to say about this project, but I’ll pause here – for now. It’s been an incredible learning journey, and one that sustained and distracted me through an emotionally-challenging couple of months in which I joined and then unceremoniously left a new job.
As I neared the end, I decided to stop by Green-Wood Cemetery, where Underwood founder John Thomas Underwood is buried. He’s a Brooklyn-based hometown hero! How funny that this project has taken me to Italy (where Olivetti is), Germany (where my new vintage computing BBS friends are), Chicago (where my typewriter is currently headed) and now my own backyard. From reading his epitaph, I have a funny feeling he’d appreciate this project:
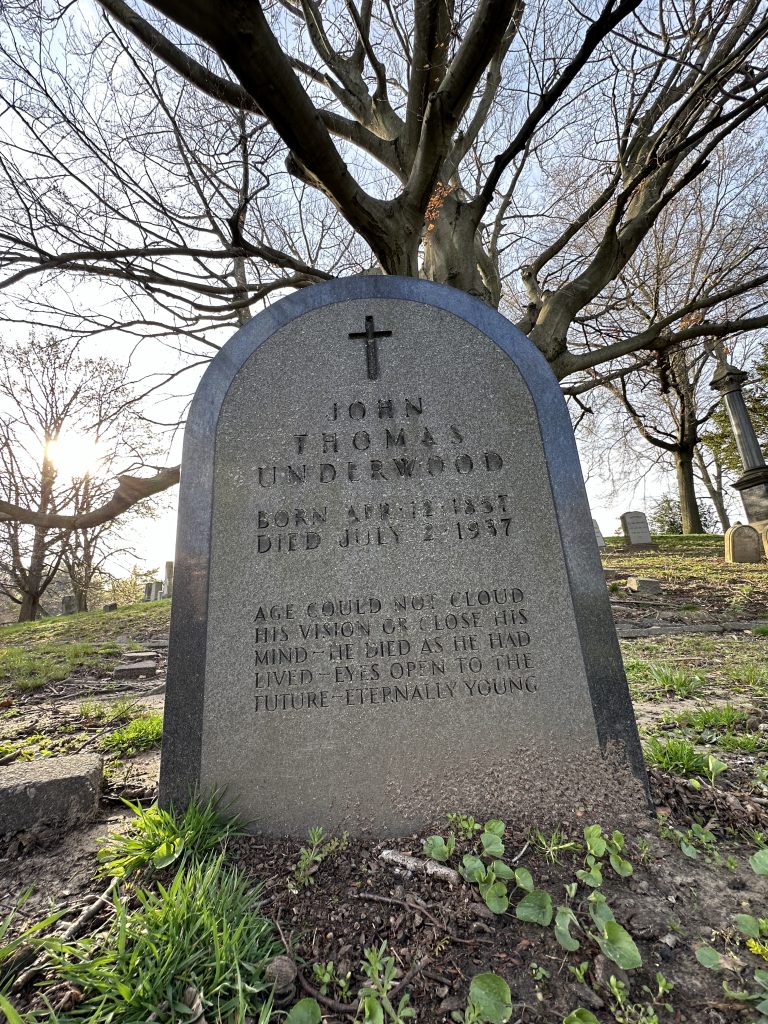
"AGE COULD NOT CLOUD
HIS VISION OR CLOSE HIS
MIND -- HE DIED AS HE HAD
LIVED -- EYES OPEN TO THE
FUTURE -- ETERNALLY YOUNG"
As always, you can find code on Github, here.