
Bit-banging a BASIC Birthday
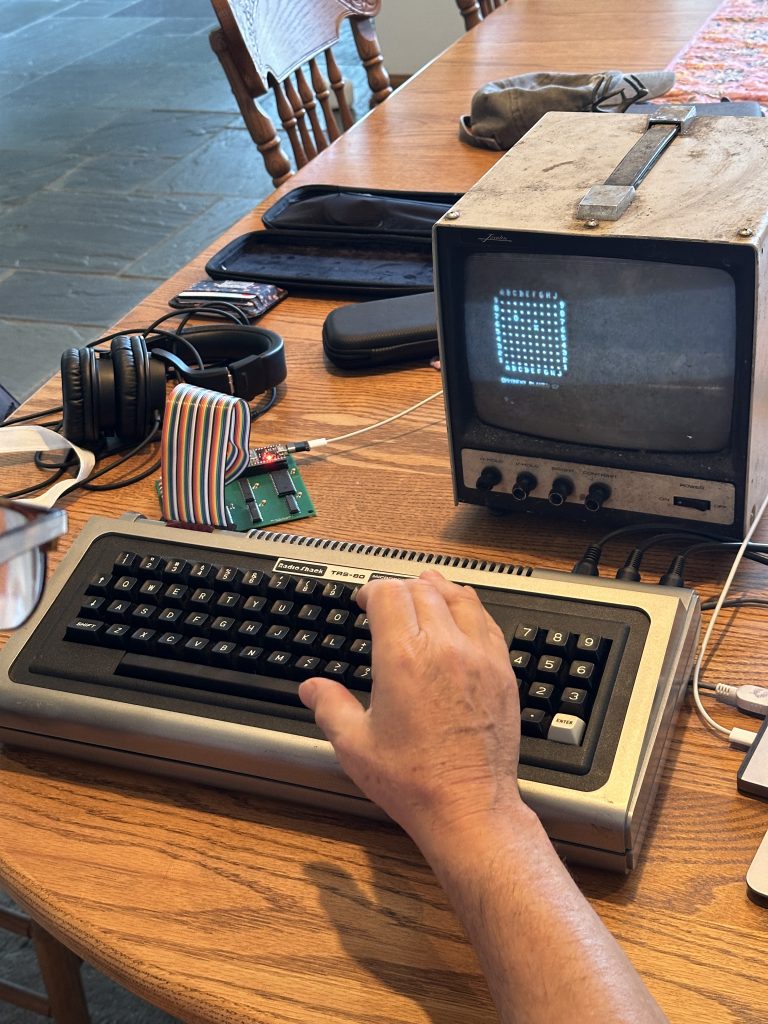
I spent this summer building a new app, for a machine that hasn’t been on the market since 1980 and wasn’t built to support graphics, sound, connectivity or even lowercase letters, sold by a company that went bankrupt a decade ago, tailor-made for an audience of one: my dad, who celebrated his 70th birthday this past Friday. Meet the MTS-70:
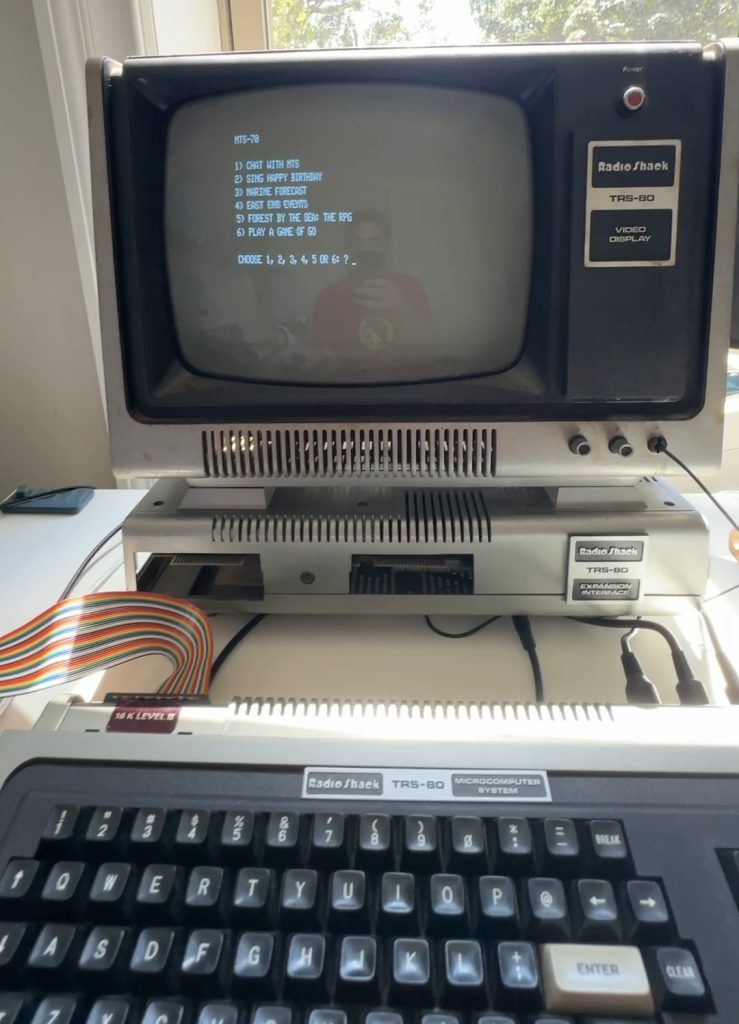
The MTS-70 is designed for a Radio Shack TRS-80 Model 1 (c. 1979). It does six distinct and very silly things, of interest to nobody but me and (ideally) my father (whose initials are, of course, MTS):
- Chat with Dadbot, a fine-tuned instance of gpt-3.5 trained on 15 years’ worth of text messages between me and my dad
- Play ‘Happy birthday’ (over the 500-baud cassette data output, a hack given the TRS-80’s lack of native audio support)
- Preview today’s marine forecast, including tide and current predictions
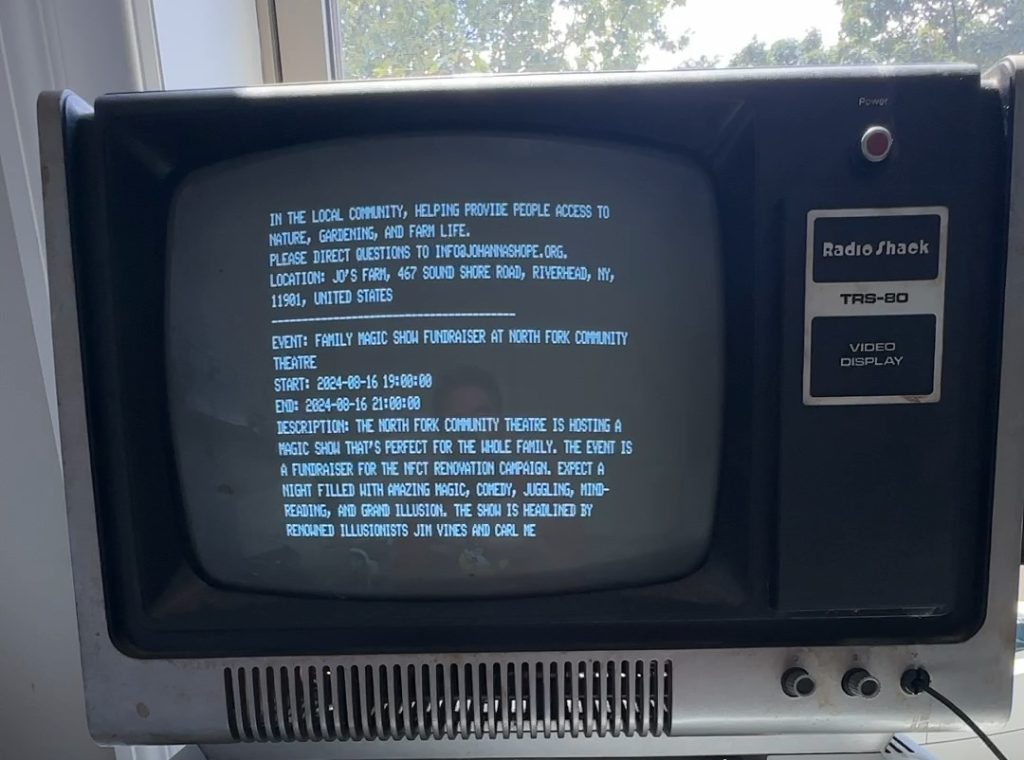
- See upcoming concerts and happenings for the East End of Long Island (where my dad resides)
- Play an LLM-powered text-based adventure game about surviving a summer on the East End, filled with ridiculous family lore
- Play a game of Go (on a 9×9 board, against a decent locally-hosted game engine)
Why the TRS-80?
Growing up, my dad always spoke reverently about his TRS-80. It was his first computer, when he first opened his law office. He reminisced abouts its heartiness: apparently one winter there had been a leak in the ceiling directly above the unit, and he just unplugged it, turned it on its side, let it dry off and then went back to work. (And, he claimed, this happened again the next winter!)
My first computer was an SE/30, so I don’t have any direct nostalgia for the TRS-80, which my dad replaced with a Mac 512k around the time I was born. It’s all borrowed from these little second-hand memories, and a general awareness of how much graybeard love there is for this machine, a true pioneer in the early days of the personal computer.
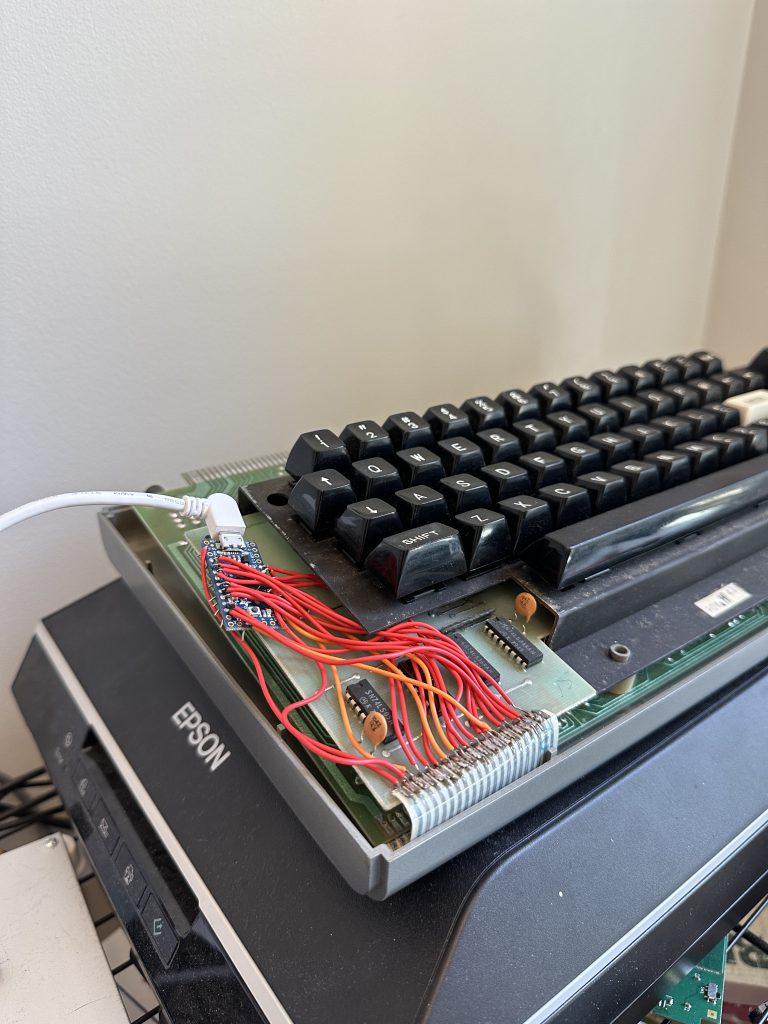
So this spring, with my mind on turning old electric typewriter parts into USB keyboards (I had a lot of spare parts on hand), I grabbed a TRS-80 off of eBay to play with. (My dad had all his TRS-80 accessories in the basement, but I thought it wiser to risk destroying a different unit!) My timing was perfect — over on GitHub, RetroStack had put together a repo just for this purpose, using an Arduino tied to the TRS-80’s keyboard address lines. I got this working pretty quickly, though I had to iterate on the code a bit to help with debouncing.
Rewinding to 1979
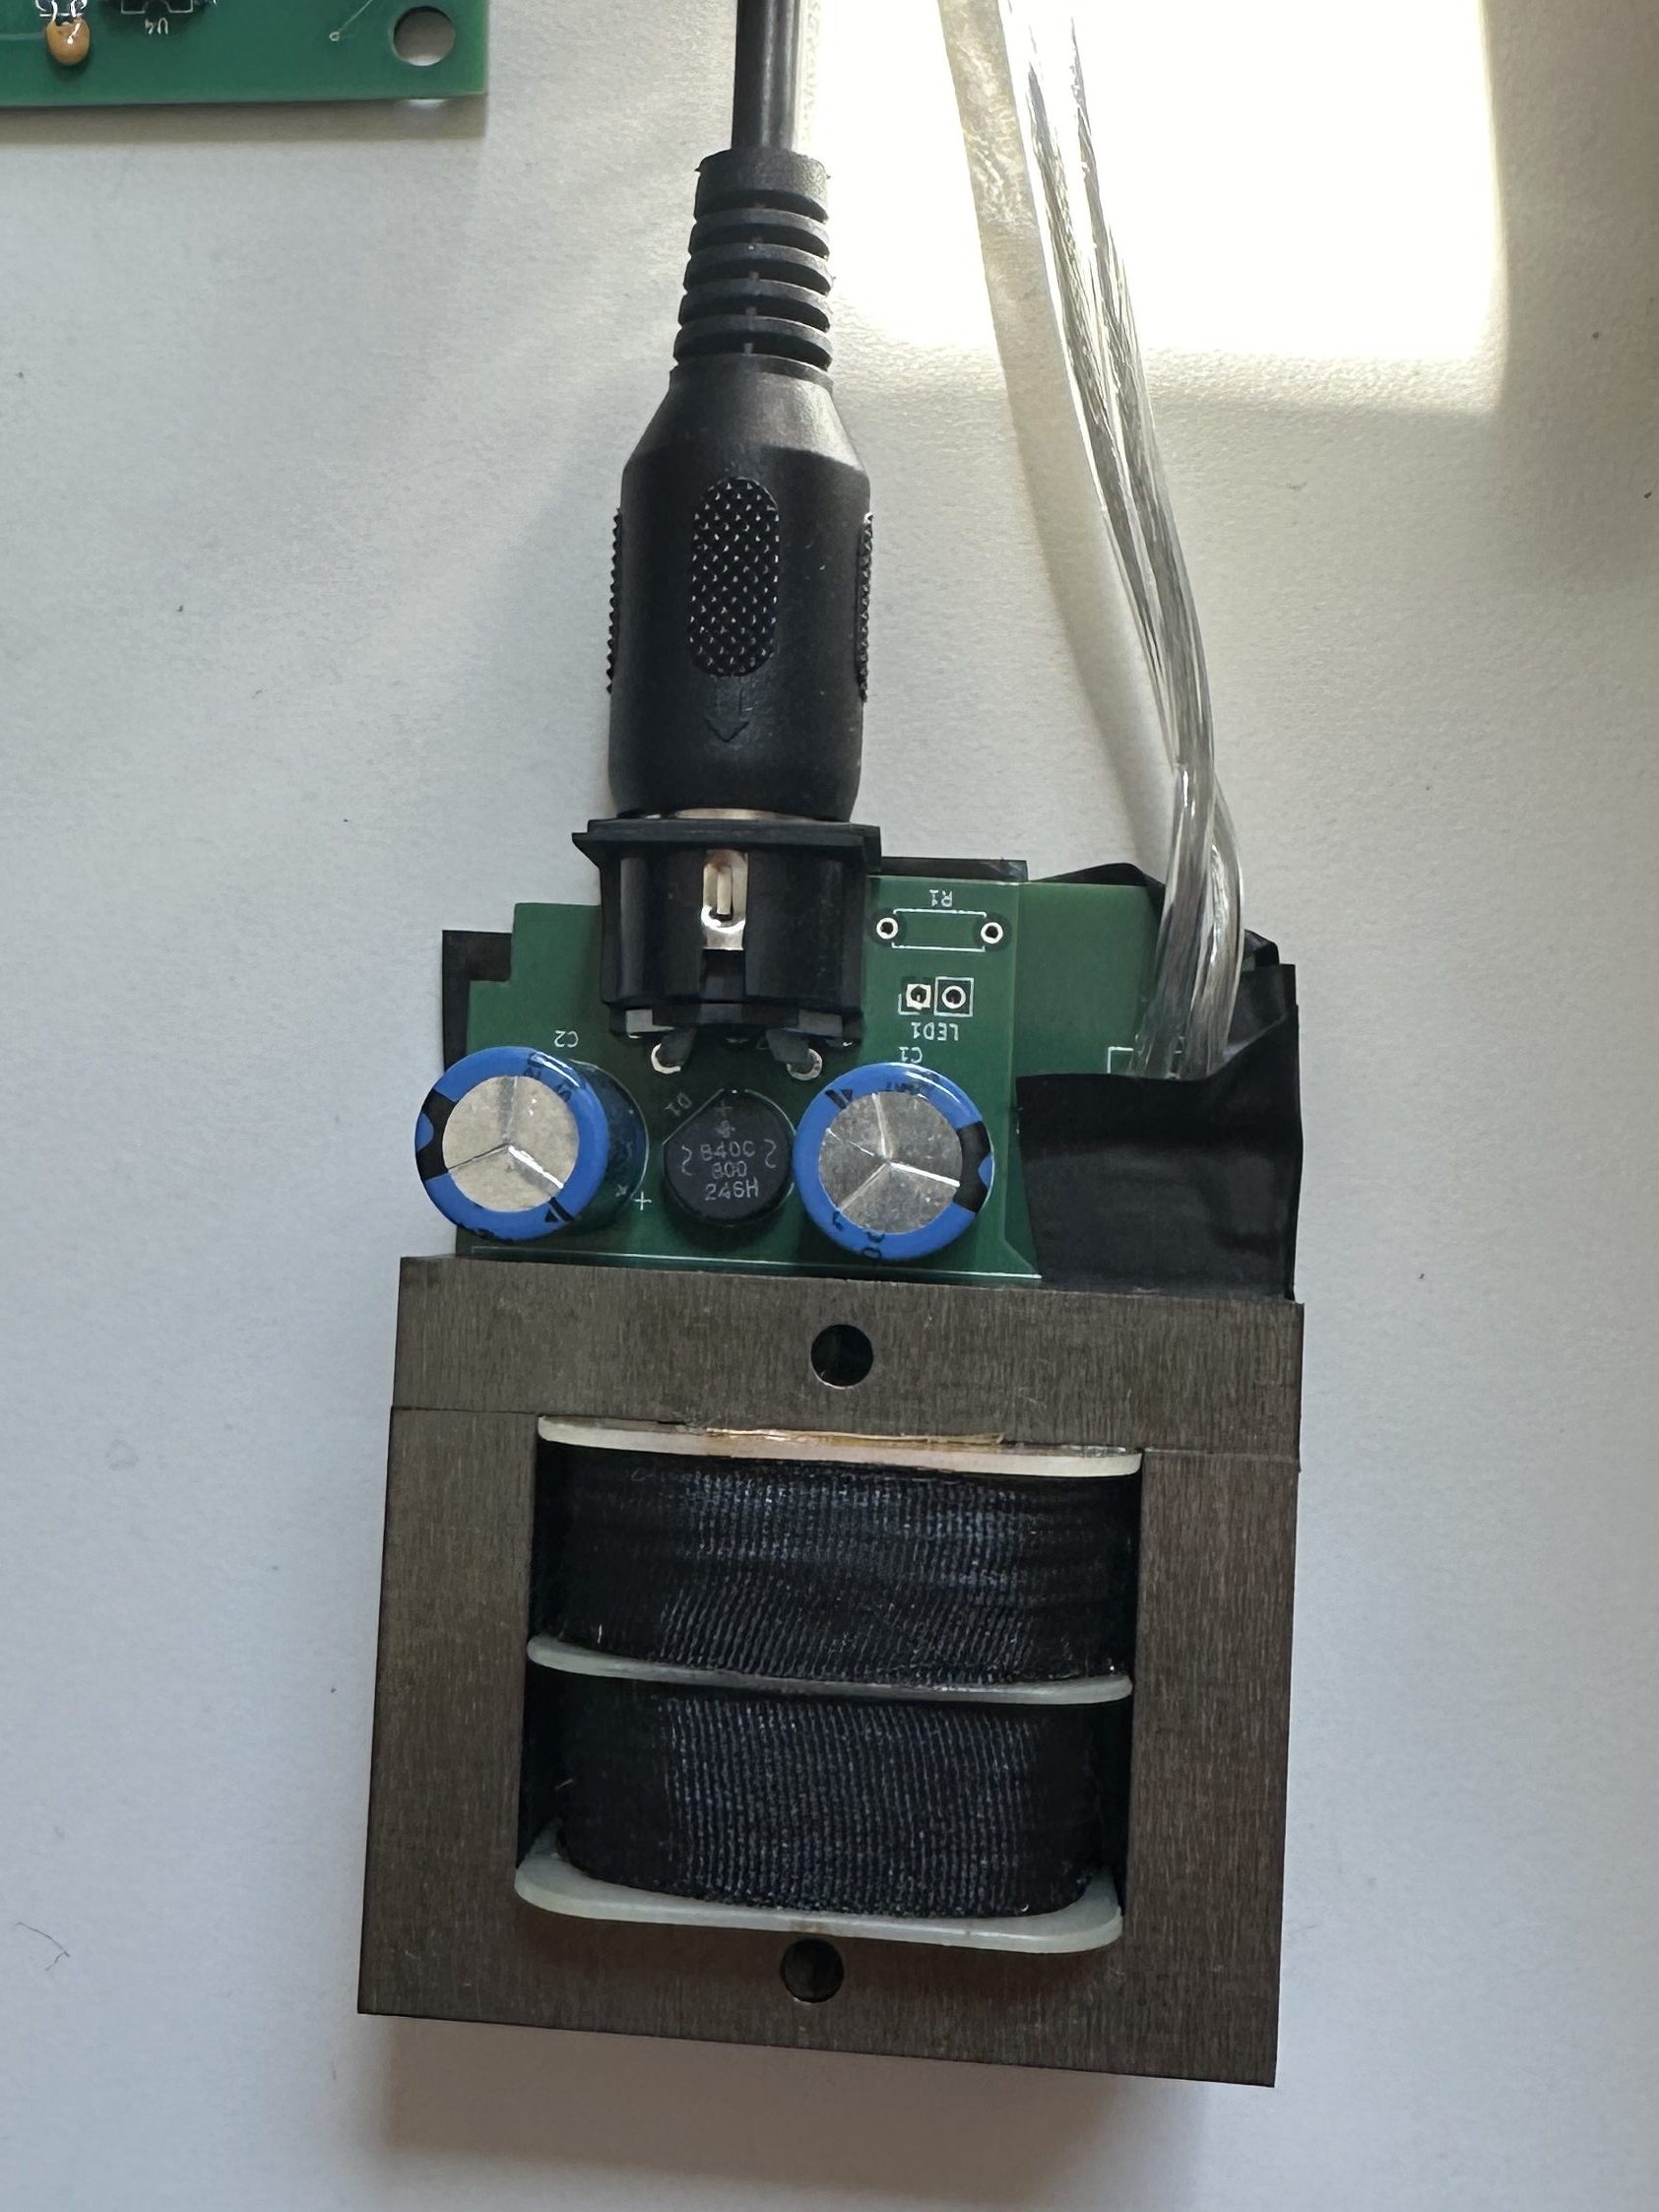
Getting the keyboard matrix working was fun, but it left me a little unsatisfied. The Model 1 lives inside the keyboard, so I had a whole machine in seemingly great condition just going to waste. And I’d heard so much about the TRS-80 over the years, but I’d never used one. The only problem was that the unit I’d purchased came as-is, without any accessories or power cords. And then a little Googling taught me that the Model 1 uses a comically complex, non-standard power cord, sending a combination of AC and DC power over a DIN-5 connector to the computer.
I hacked together a power supply of my own making, later iterating and assembling a custom PCB designed by @maboytim. (I also learned a ton about the circuit from Shock Risk’s reverse-engineered power supply schematic.) This involved so much trial-and-error. I still don’t really understand how center-tapped, dual-winding transformers work. On some level I hope I never have to. But I wound up with a homebrew power supply that worked great.
Using a TRS-80 to composite video cable from 8-Bit Classics and an RCA to HDMI video input adapter allowing me to use my MacBook as a display, I held my breath and turned on the machine. Lo and behold: it booted up!
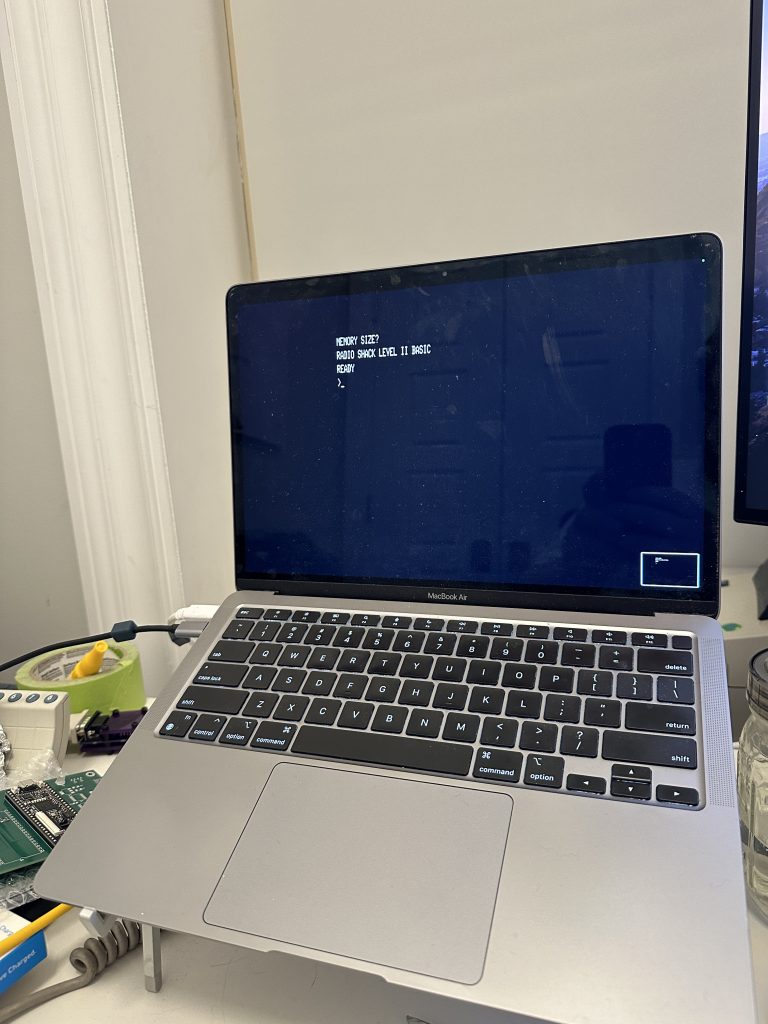
I couldn’t get a whole lot further than booting up, though. The TRS-80 was designed to load data through cassette tapes (though it did support 5.25″ floppies through a separate Expansion Interface). I learned that there’s a lot of homebrew support for archiving cassette data and replaying it, usually through a Windows app called PlayCAS. With the help of some driving instructions for the TRS-80, I learned that loading BASIC programs over cassette starts with a simple command: CLOAD.
Only thing was, my ‘A’ key didn’t work. Of course. So it was back to eBay, where I bought a replacement switch for the TRS-80 keyboard and laboriously installed it.
Now we were in business. With my ‘A’ key working aganin, I had PlayCAS running through a Windows XP emulator using UTM on my M1 MacBook Air, sending cassette data through the computer’s headphone jack over a TRS-80 audio input cable. Phew! Now I could load just about any program in the TRS-80 universe.
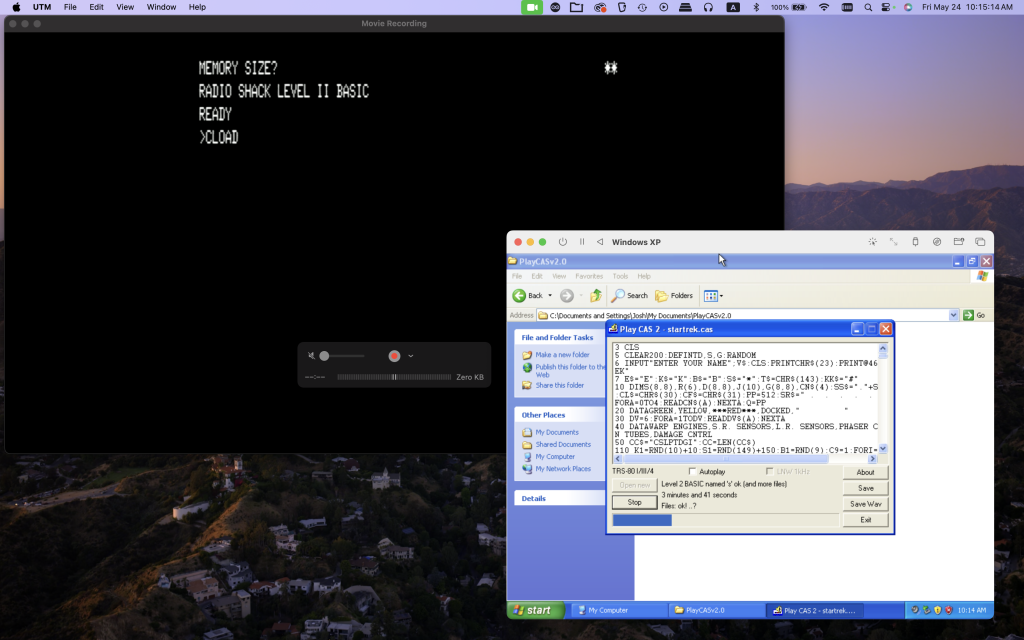
(Eventually, by the way, I learned that I could just as easily convert BASIC files into WAV audio and load them directly from my Mac, rather than using a specialized tool. The key to this is a wonderful command-line app called trs80-tool.)
Fast-forwarding to 2024
Loading programs got me thinking… I wonder if it’s possible to get one of these things online. Perhaps someone has hacked a serial interface or TCP/IP connectivity? It turns out, lots of people have! Over on the hobbyist forums, @GK2001 provided a deep-dive into his bespoke RS-232 card. And I eventually found my dad’s Expansion Interface, which had an RS-232 card installed into it, though I never got two-way serial working properly (even after replacing most of the ICs on the card!).
But the real key was discovering @apuder’s TRS-IO. TRS-IO is a card that hooks up to the TRS-80’s 40-pin expansion slot, emulating a lot of the functionality offered by the original Expansion Interface. It adds 32k of emulated RAM, a real-time clock, and rudimentary internet connectivity using an ESP32 card. Recent iterations also offer HDMI output by way of an FPGA card. I spent, no kidding, months trying to get the TRS-IO to work right. The most recent versions of the card are designed for surface-mount soldering, so I spent weeks hunched over my workstation, looking through a magnifying glass and soldering tiny connectors. My SMD soldering game improved immensely as a result of this, but in the end, I was only able to get an earlier, simpler, thru-hole version of the PCB working. I also had to learn how to compile and flash ESP32 code, as well as the Verilog used for the Tang Nano 9k FPGA card (before I gave up). This was an insane learning journey. My best pro tip here is to make friends with @apuder and @maboytim in the Tandy Discord server, and spend a lot of time perusing the closed issues on the TRS-IO GitHub repo.
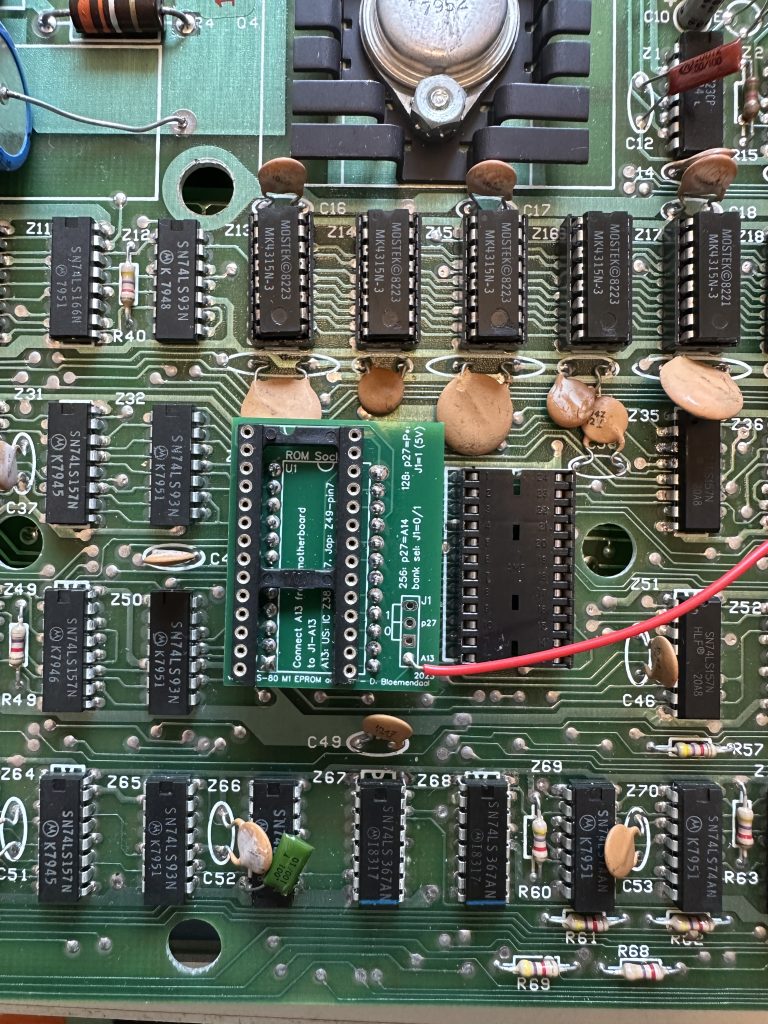
Trying to get the TRS-IO working sent me down all sorts of rabbit holes. I experimented with removing add-ons, like the official Radio Shack modification that enabled lower-case letters. I followed complex instructions to flash modern EEPROM chips with more recent versions of the TRS-80 ROM just in case the earlier version was responsible for the issues I was having with the TRS-IO. (It almost certainly wasn’t.) That required yet another PCB ordered from China (thanks to @maboytim and @dannybloe’s adapter module) and assembled by hand, flashed from a TRS-80 ROM binary file using an EEPROM programmer device, and installed within the unit. Truly wild.
And of course, along the way the machine stopped working entirely. I spent a few weeks recapping the board, and systematically replacing every DIP switch and IC I could to get video output working again. Some true Ship of Theseus stuff happening. I bought a handheld oscilloscope but I haven’t really made sense of it yet. I think I just got lucky. I couldn’t have done it without Sams Computerfacts (c. 1985) and this troubleshooting guide.
It also took me forever to get my dad’s TRS-80’s Video Display working. The tube warmed up and the brightness knob worked, but I couldn’t get anything from the TRS-80. With help from the service manual and some hobbyist forum threads, I tried just about everything, from recapping the video board to replacing various rare and discontinued transistors. Eventually I discovered that I had more than one issue: replacing the video board’s 2n3906 transistor and bridging the RF choke at L2 on the main board got things working, though I’m still using a hack to inject a composite signal, since I could never figure out why the proper TRS-80 input doesn’t work. I’m lucky I didn’t electrocute myself working on this CRT, please don’t try this at home.

Anyway, when I finally got everything working and typed ?MEM on the TRS-80 keyboard and saw 48k of RAM available instead of 16k, I nearly cried. Everything fell into place pretty swiftly after that.
Once I finally had an IP address thanks to the TRS-IO, I of course first thought about how to get gpt-4 working. It turns out @druid77 beat me to it, releasing TRS-GPT last fall. His code, itself built off the WHOIS example provided in the TRS-IO repo, came in super handy. I stand on the shoulders of so many giants.
After that, I started assembling little modules one by one. Inspired by the TRS-GPT example, I used a Python script on my Mac to do all the heavy lifting, and borrowed a lot of help from ChatGPT to construct and refine a BASIC program that would let me demo all the dad-specific functionality I wanted to include. Using ChatGPT came in handy a million times — like when I couldn’t figure out how to switch from port 43 to port 5050, all because it was piped through the hardware interface in some most-significant-bit, least-significant-bit format that was entirely opaque to me.
So, phew. Here’s a little bit more detail about each of the fun little things you can do on the MTS-70.
Singing happy birthday
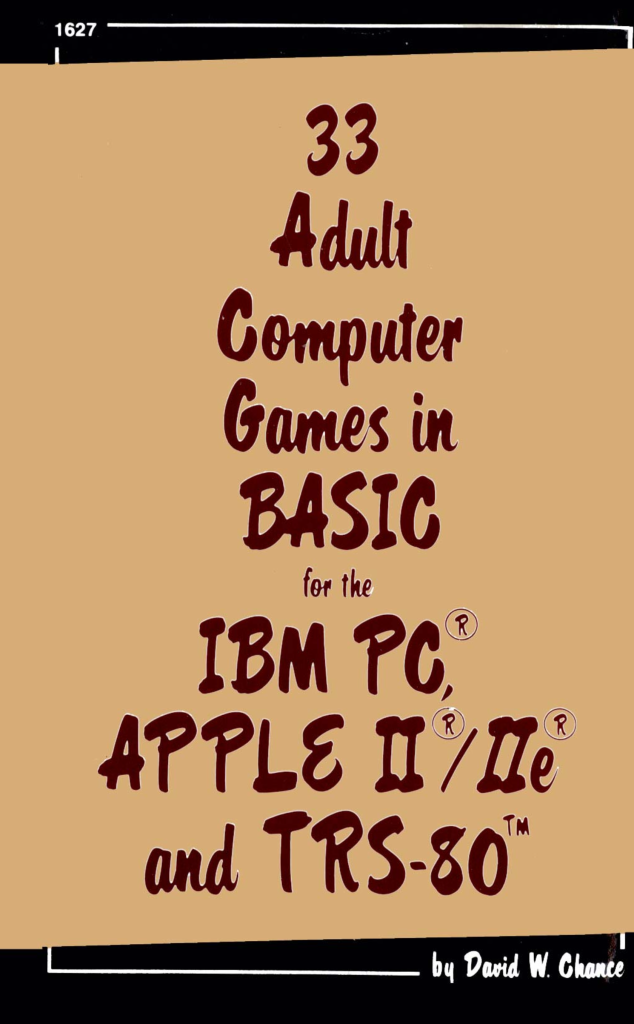
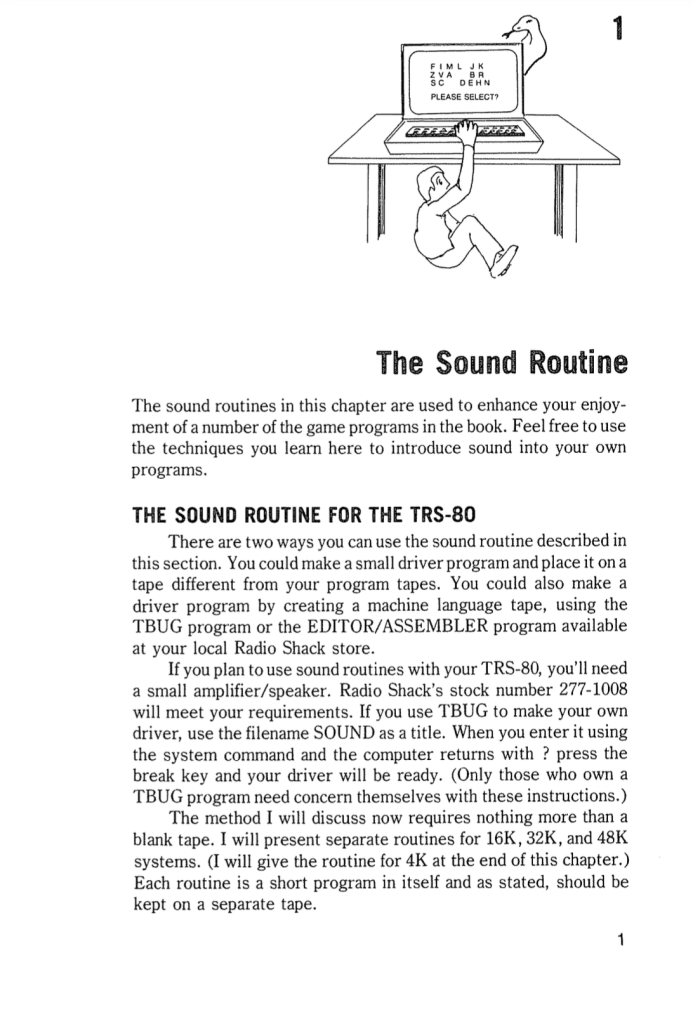
The TRS-80 Model 1 lacks sound functionality. Apparently once upon a time, someone figured out how to repurpose the machine’s ability to save data to cassette to make some simple bleeps and bloops (and, due to the machine’s incredible radio interference, you could apparently just put an AM radio on the desk nearby to capture the output. lol). I didn’t find this well-documented online, and I couldn’t really make sense of any of the source code I found, much of which was in assembly instead of BASIC. Eventually, though, I found a guide to ‘adult’ TRS-80 games from the early 80s that began with a very clear set of instructions and even a sound driver that reserved some RAM and defined some functions for banging some bits into bloops.
Using a pitch tester app on my phone, I was able to use the sound examples from this book to convert data tones to specific playable notes, and, attaching a little external powered speaker, you get happy birthday. 🙂
Playing Go
This was another fun one. My dad loves to play Go, and can spend hours mesmerized in the middle of a game. At first I thought I could just make gpt4 play Go, but it does a terrible job. (I guess you have to create or finetune a specific model like AlphaGo, though this apparently destroys love of the millennia-old game.)
So after hunting around a bit, I discovered gnugo, a command-line Go engine which offers an ASCII interface and acts as a decent opponent. My Python script opens a subprocess and sends gnugo commands to the terminal, then generates an ASCII board that gets sent to the TRS-80. It plays on a 9×9 board, mostly because the screen isn’t even big enough for 19×19! The engine was good enough to engage my dad and yield murmurs of “hmm,” “interesting,” and “ha!” In the end he had notes, which makes sense, since I’m not a Go player and am probably dishonoring the game by even creating this proof-of-concept to hack it. (I DO wish I’d gotten this connected to an API like the one provided by online-go.com – it’d be fun to challenge other players and play a full game this way!)
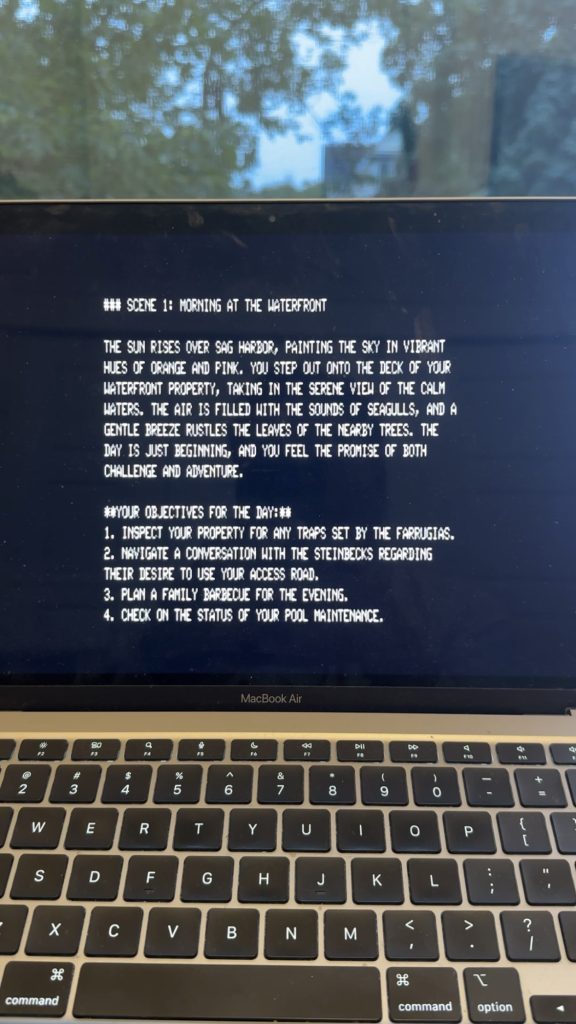
Role-playing homeownership
My parents live out on Long Island in a lovely house on the bay. My dad has always liked to call it “Forest by the Sea,” so that became the genesis of my little gpt-4 powered text-based adventure game. I fed gpt4 a system prompt in which I assigned it the role of dungeonmaster, and gave it a few plot beats from my parents’ lives, as well as some specific colorful lore from their decades living at the house so it could feel extra realistic. The prompt mentioned threats like dodging Hamptons summer folk, managing lawn and pool maintenance, and dealing with beach erosion. (Fun fact: yes, they once sparred with John Steinbeck’s widow Elaine about maintaining an easement through their property to drive onto their little spit of beach.)
In some ways this was the simplest of all the mini-apps, but it’s absolutely the one that amused my family the most when I demoed the project. I had to keep reminding them that the game was unwinnable and that they’d simply play out the RPG forever unless they decided to give up. I guess that’s kind of like homeownership?
Chatting with Dadbot
After building Joshbot, I of course had to try my hand at Dadbot. It was surprisingly hard to get good results here, and I’m still troubleshooting it. The source material here just looks very different: it’s limited to my own text message interactions with my dad (used for this purpose with his consent), which are often brief and transactional, and which can be very hard to split into question-answer pairs, because of course some texts go unanswered and pile up. I created a gpt4 macro in Google Sheets to generate complementary messages so we could have question-answer pairs to finetune gpt3.5. (Also, I tried using gpt4o, but I got much more authentic results with 3.5!)
It’s still tons of fun to interact with my fake robodad via this interface, though. Highly recommended.

Events & weather
I decided to add functionality for gathering a marine forecast and local concerts, since my dad has always loved boating and East End nightlife. For these, I simply have my Python server script pull in local data. Weather event comes from NOAA and NWS sources, from designated local weather stations, concatenated and sent over the TCP/IP socket. Events are gathered from an East End events calendar I’m parsing using the Python icalendar library. Seeing anything fresh and modern over this interface still blows my mind.
Living la vida Tandy
So. If you’re curious how the MTS-70 was received, I can report that it was huge hit out East during our birthday weekend. Given that this project emerged from borrowed nostalgia about the TRS-80, it was fascinating to see the limits of my dad’s own reverence for this ancient tech.
As for me, my own nostalgia is a bit of a mixed bag. This project fought me every step of the way. Seriously. It took me three months to get here, something I never expected. I had ROM chips fail just because I looked at them funny. At the same time, it’s clearly a robust machine. And it’s wonderful to get to work with an iconic tech building block, a prerequisite for so much of the computing universe we know and love these days. It’s also really fascinating to get to work on a machine that literally boots up into a BASIC programming interface. Using the TRS-80 truly is indistinguishable from programming!
It’s also been so cool to see how big the TRS-80 hobbyist community is. 50 years on, I’ve come across so many expansion boards, emulators, clones and utilities devoted to keeping this stuff alive. It’s such a vibrant and inspiring place, and it’s been so fun to be a small part of it.
Stay tuned, because we haven’t seen the last of the TRS-80. I’m still working on my next project, in which I’ll get the TRS-80 and SE/30 talking to each other, if all goes according to plan.
P.S. Fun fact! The Z80 chip, which provides the backbone to the TRS-80, was only discontinued earlier this year, after nearly 50 years of production. What a legacy.
The MTS-70 can be explored on github, here.