Generative Digitizing
A few years ago, I was over at my partner’s house for Thanksgiving when her mother mentioned a chest full of old photos. We dug in, amazed by the relics that she hadn’t seen in decades — or, in many cases, ever. This year, inspired by my nostalgic digitizing and generative AI projects, I decided to pack my trusty Doxie scanner in my carry-on so I could gift her family the contents of their own dusty archive.
As I started scanning, though, I kept being reminded of how fragile and imperfect analog archives can be. Fragile old photos bleached by the sun, punctured by push pins, scissored into collages, or ripped and torn. Pristine old photos with copious red-eye, thumbs on lenses, lens flares, film grain, film studio watermarks, color casting and other compositional or film processing issues. And last but not least, streaks caused by little motes of dust on the Doxie’s image sensors. (This one I really wish I’d noticed before I scanned a thousand photos.)
With a daunting retouching task in front of me (and my own family’s photo archive also in need of some attention), it seemed like a perfect opportunity to take advantage of new generative AI models and tools and see how far I could push them: the days of Healing Brush may not be behind us, but the toolkit is so much more interesting now!
Retouching: Generative Fill
Generative Fill is an incredible all-purpose healing, repairing, and retouching tool now out of beta and built into Photoshop. It can do any number of creative tasks, but restoration is where it really shines.
I used Generative Fill for all sorts of tasks: correcting scratches, tears, punctures and dust; filling in missing data after rotating a skewed image; and – as seen below – removing watermarks. We had several old photo proofs with studio watermarks in complex places — covering jewelry, hair and faces, cluttered tables. In each case it was able to eliminate these with nothing more than a lasso selection and one tap. I rarely added a prompt: to remove data and normalize a photo, it seems to work best without one.

Upscaling: Magnific.ai
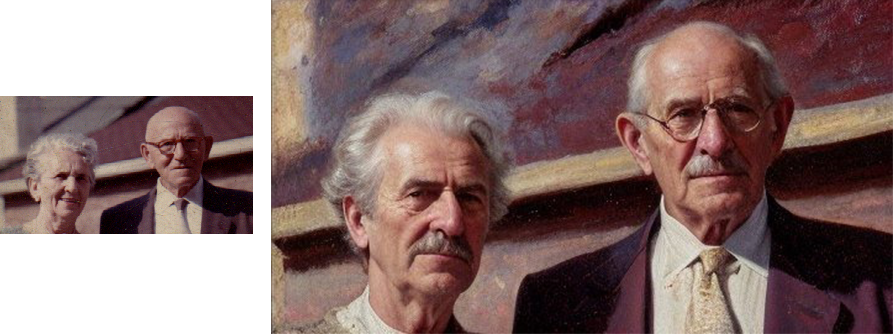
Magnific.ai is a sort of ‘creative upscaler’ that was released just this week. Most upscalers struggle to add missing data to lower-resolution photos, but that’s where Magnific shines: it upscales while generating additional detail, with a sliding-scale range of creativity. I passed it several extremely low-resolution photos I scanned in 1999 — before sadly and shamefully misplacing the originals! For two decades I’ve occasionally experimented with upscaling the ~300×300 pixel originals, but this has never yielded useful results. With Magnific, it often does, as in the example below, of my father with my great-grandparents. With additional prompting, referencing other source photos, and piping in the other tooling in this list, I’m sure I could push this even further — but every increase in fidelity is a gamble with the uncanny valley.

Colorizing: Time Travel Rephotography
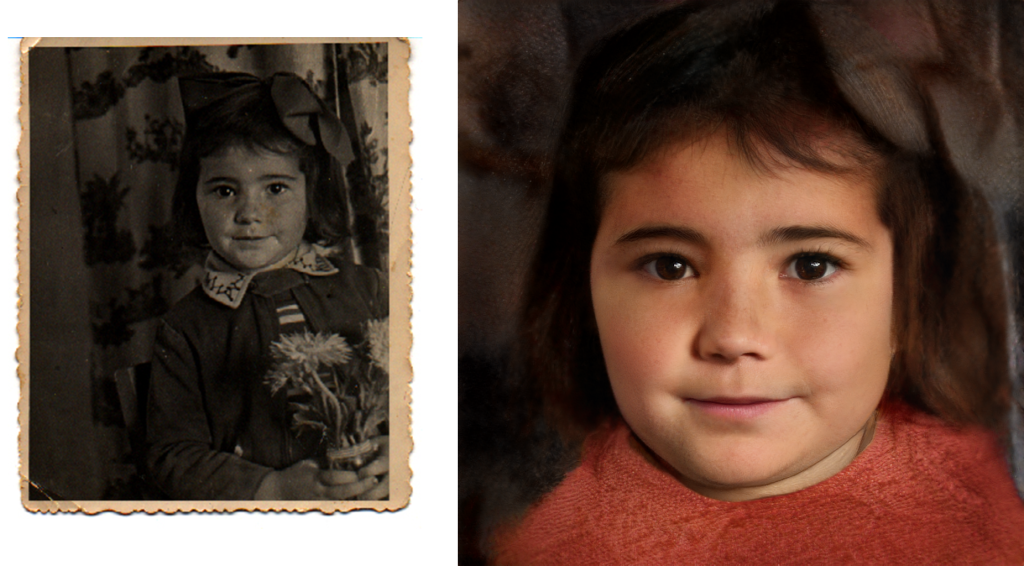
Among our old photos are, of course, many black-and-white originals. To experiment with colorizing, I used a tool called Time Travel Rephotography, which identifies a portrait, finds a sibling image in some training data, and then uses the adversarial StyleGAN2 model to generate a new photo that maps very closely to the black-and-white original while bringing in the realistic colors and textures of the sibling image. Below is an example featuring a childhood photo of my aunt Eva, who passed away earlier this year. This original was also in my trove of low-res scans, so I started by upscaling via Magnific and then piped the result into a Colab derived from the github link above. In many cases I then piped the result back into Magnific to add additional detail (e.g. eyelashes and shadows).
Motion blur: GFPGAN & CodeFormer
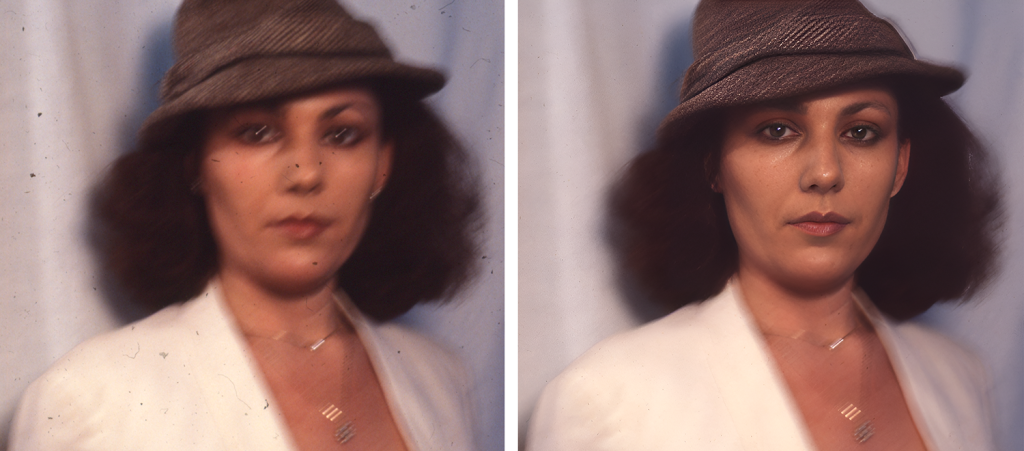
Since my aunt passed away, I’ve spent a fair amount of time digitizing and restoring old photos of her in my archive. In high school, my mother had shot a few rolls of slide film featuring my aunt as the subject, but many of the resulting images suffer from motion blur. I experimented with two models to restore these portraits: GFPGAN and CodeFormer, which use two different approaches. (GFPGAN references other photos via StyleGAN2, similar to the Time Travel Rephotography method, while CodeFormer uses a discrete representation space, which I’m not even going to pretend to understand.) In both cases, the models correct only the faces, then blend the results back into the original image, which otherwise retains its blurriness.
Mixing and matching is key
My workflow for each photo often involves more than one tool. I might upscale with Magnific, colorize with Time Travel Rephotography, then come back to Magnific to add more detail. Or I might correct some imperfections in Photoshop with generative fill, then turn to GFPGAN and then bring the results into Magnific to smooth out the rest of the photo. In one case, I removed some textured paper moire effects by smoothing an image Photoshop, then used Magnific to add back the detail I’d smoothed (sans the paper texture)! I’ve even downscaled, generated some corrections, then upscaled again — which sounds like heresy. Experimentation is the name of the game.
A word of caution
No generative AI tool is perfect. These tools still can’t generate detail that wasn’t there — without your eye to gently redirect it when it’s gone astray. Prompting can make all the difference, and the uncanny valley is always right around the corner. Tread carefully and mindfully — just take it from Gussie and Jacob: